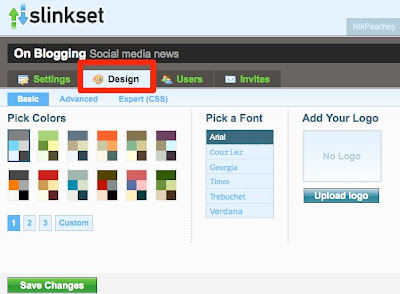
For the last few weeks I've been trying out a free tool called Slinkset and I have found it to be pretty useful. Slinkset is a tool that enables you to create your own 'portal' site ( A 'portal' site is one that links to other content rather than a tool for producing content) and I've been using it to create a kind of educational technology news site. I've used it to keep track of the things that I'm reading, writing and watching online as well as adding a few links to conferences.
If like me you find and share a lot of links to interesting articles etc on Twitter, you might also suffer from my frustration at then having to try to find these articles later when you want to refer to them or pull out a quote etc. Creating my news portal has solved this problem and also enabled me to build up reading /viewing / writing lists that I can share, so this also adds some value to my network too.
I've decided to go it alone at the moment and only add links myself, but you can use it collaboratively with a group of editors (something that I'm considering) or make it open to anyone who wants to contribute (an idea that I've rejected to avoid overload and spam and to help maintain quality, etc.)
The sites that it creates function a little like Digg, in that visitors to the site can vote stories up or down and leave comments on the etc. You can also enable visitors to leave their own links ad comment on them. You can easily create your own categories too so that helps you to stop it turning into just a massive link dump.
How to create your portal
- To create your own portal site just go to http://slinkset.com/ and click on the 'Try it Now' button. You'll have to register, but that's pretty simple and information minimal (you really just need an email address).
 Once that is done you can start creating your portal. You give it a name, decide on the URL and a subtitle that tells people a bit about the aim of the portal.
- You'll also need to decide on the level of collaboration you want and whether you want to have a team work on it or let anyone contribute.
- You can always change this later, so don't worry to much about this.
- Once you have clicked on 'Create site' your portal is live and you'll be directed to the dashboard where you can customise it.
 If you click on the design tab you'll see that you can select a colour scheme for the portal. You can even edit the more advanced features like CSS if you feel more confident.

- Within 'Settings' you can also set up the portal so that it automatically takes content from RSS feeds. So you can use this to read the feeds from your own blog or blogs that you like to follow.
- Another useful feature under 'Settings' is the 'Categories' and here you can set up various subgroups for you content.
 If you look under the advanced setting you'll also see that you can host your portal on your own custom domain and add thins like analytics tracking code etc, so that's worth checking out if you are really going to take this seriously.
- It's also worth checking out the sidebar feature. The default site that you create will have Google ads on, but once you edit your sidebar these will disappear and you can use it to add links to your own sites, as I do, or to link to any fixed features you want such as an audio, video or image file.
 If you want to see what your site looks like as you fork just click on the 'Go to site' link and you can check it out, then come back and make more changes if you wish.

- One thing that I would strongly recommend is that when your site is ready, you go to submit your first entry and when you submit one you will see a 'bookmarklet', drag this up to the toolbar of your web browser.
 Then when you see and article or web page that you want to link to, you just click on the bookmarklet and the submission form will open with most of the details already in.
How about you?
- Have you used any similar tools for portal building?
- How effective were they?

0 comments:
Post a Comment